Building a Connector
Connectors are the vital gateway to enhancing FLOWX.AI's capabilities. They seamlessly integrate external systems, introducing new functionalities by operating as independently deployable, self-contained microservices.
Connector Essentials
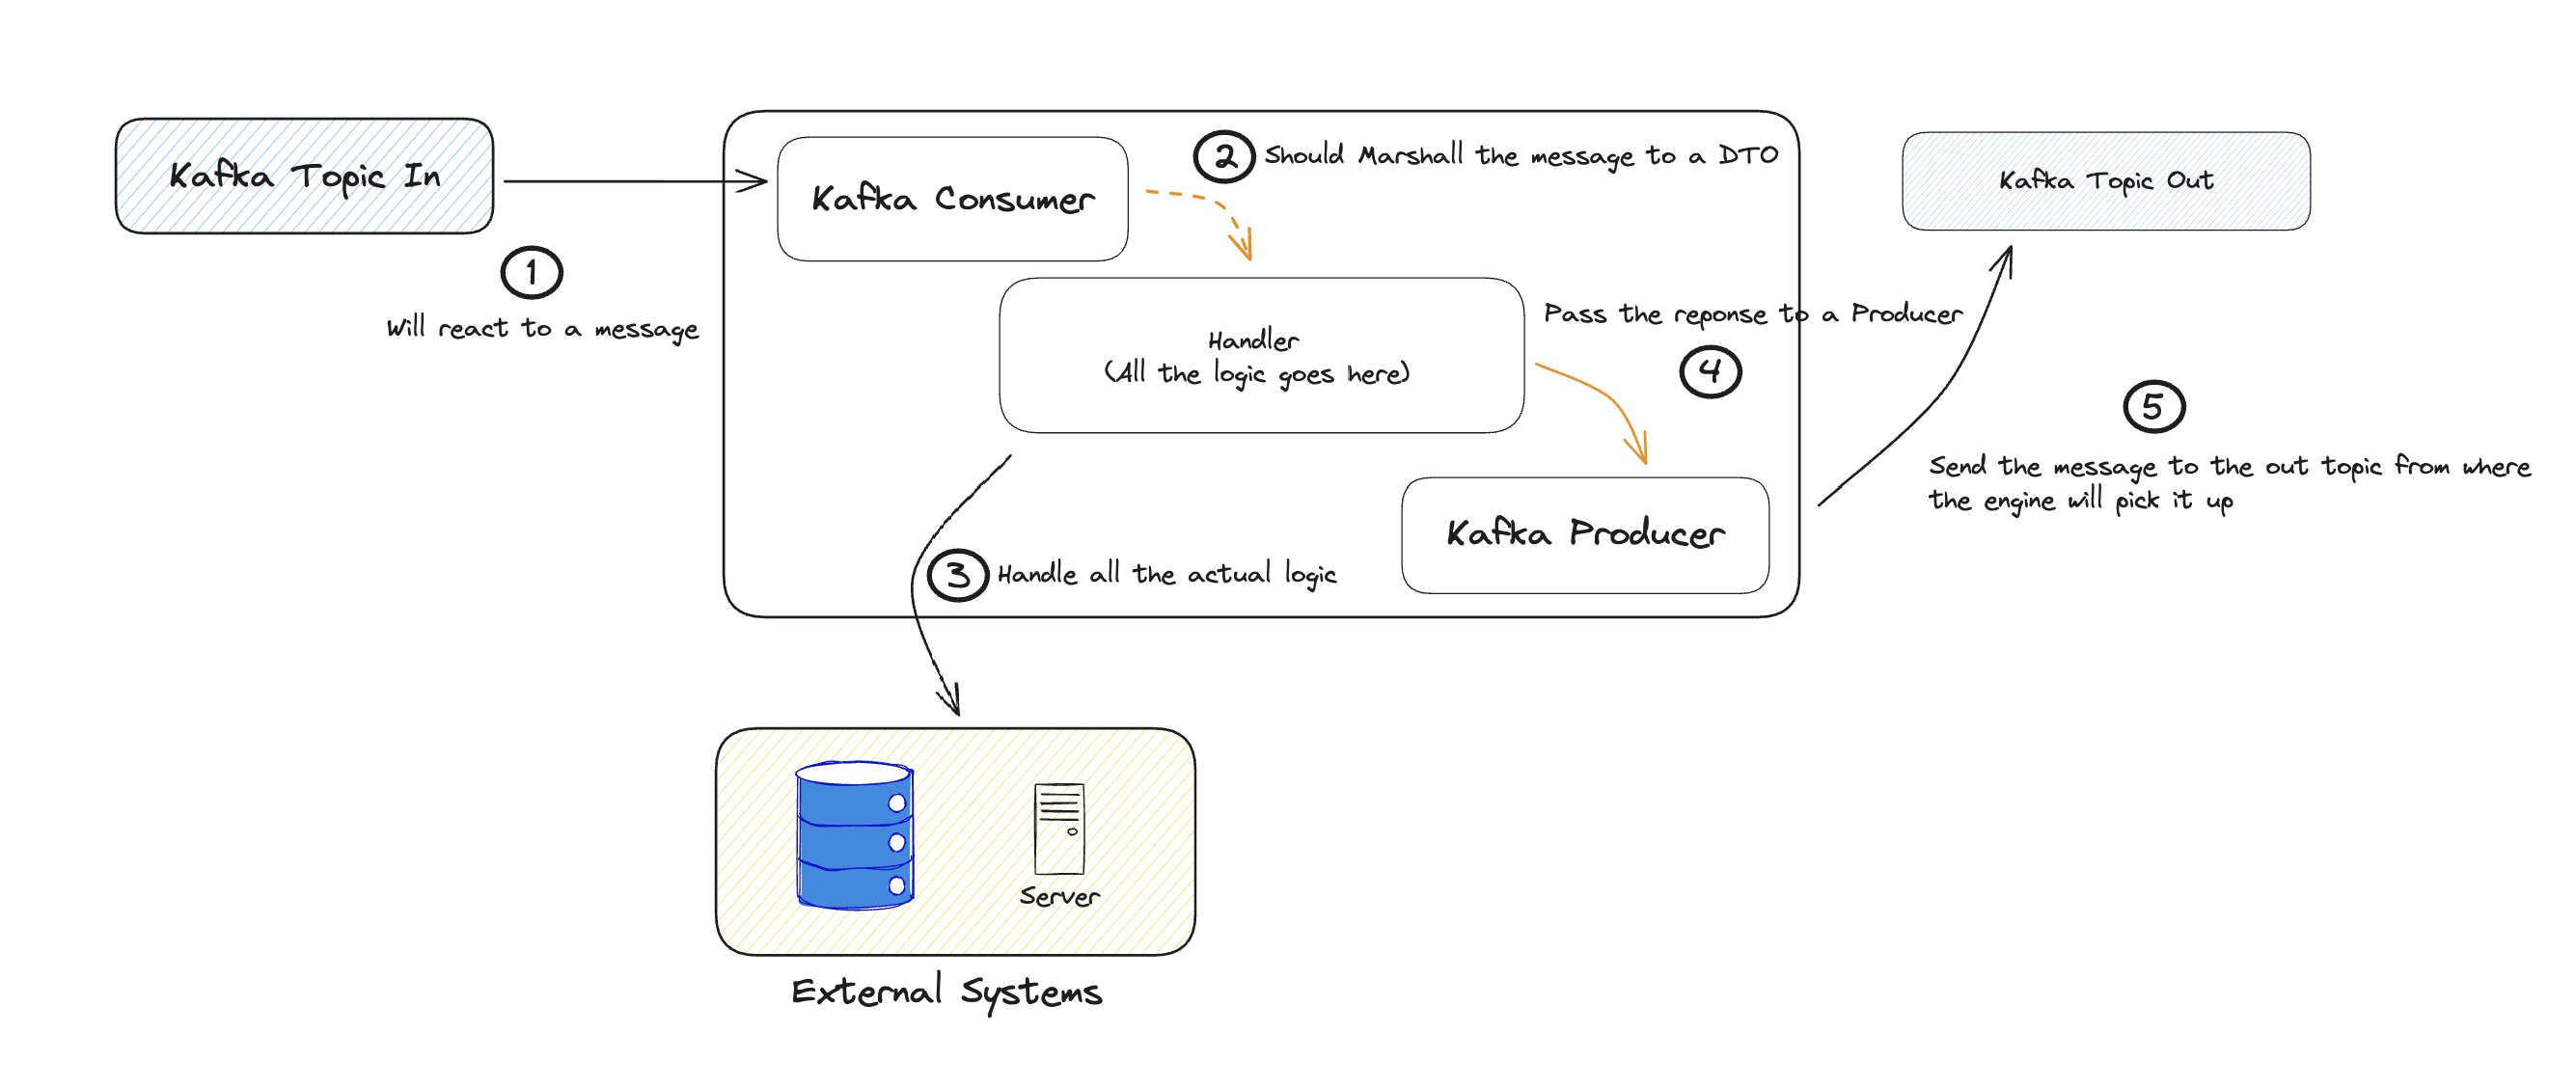
At its core, a connector acts as an anti-corruption layer. It manages interactions with external systems and crucial data transformations for integrations.
Key Functions
Connectors act as lightweight business logic layers, performing essential tasks:
Data Transformation: Ensure compatibility between different data formats, like date formats, value lists, and units.
Information Enrichment: Add non-critical integration information like flags and tracing GUIDs.
Creating a Connector
Create a Kafka Consumer: Follow this guide to configure a Kafka consumer for your Connector.
Create a Kafka Producer: Refer to this guide for instructions on setting up a Kafka producer.
Adaptable Kafka settings can yield advantageous event-driven communication patterns. Fine-tuning partition counts and consumers based on load testing is crucial for optimal performance.
Design Considerations
Efficient Connector design within an event-driven architecture demands:
- Load balancing solutions for varying communication types between the Connector and legacy systems.
- Custom implementations for request load balancing, Connector scaling, and more.
Incorporate all received Kafka headers in responses to ensure seamless communication with the
Connector Configuration Sample
Here's a basic setup example for a connector:
- Configurations and examples for Kafka listeners and message senders.
- OPTIONAL: Jaeger tracing configurations and examples.
- OPTIONAL: Activation examples for custom health checks.
Follow these steps and check the provided code snippets to effectively implement your custom FLOWX connector:
- Name Your Connector: Choose a meaningful name for your connector service in the configuration file (
quickstart-connector/src/main/resources/config/application.yml):
spring:
  application:
    name: easy-connector-name # TODO 1. Choose a meaningful name for your connector service.
  jackson:
    serialization:
      write_dates_as_timestamps: false
      fail-on-empty-beans: false
- Select Listening Topic: Decide the primary topic for your connector to listen on ( you can do this at the following path →
quickstart-connector/src/main/resources/config/application-kafka.yml):
If the connector needs to listen to multiple topics, ensure you add settings and configure a separate thread pool executor for each needed topic (refer to KafkaConfiguration, you can find it at quickstart-connector/src/main/java/ai/flowx/quickstart/connector/config/KafkaConfiguration.java).
Define Reply Topic: Determine the reply topic, aligning with the Engine's topic pattern.
Adjust Consumer Threads: Modify consumer thread counts to match partition numbers.
kafka:
  consumer.threads: 3  # TODO 4. Adjust number of consumer threads. Make sure number of instances * number of threads = number of partitions per topic.
  auth-exception-retry-interval: 10
  topic:
    in: ai.flowx.easy-connector.in # TODO 2. Decide what topic should the connector listen on.
    out: ai.flowx.easy-connector.out # TODO 3. Decide what topic should the connector reply on (this topic name must match the topic pattern the Engine listens on).
- Define Incoming Data Format (DTO): Specify the structure for incoming and outgoing data using DTOs. This can be found at the path:
quickstart-connector/src/main/java/ai/flowx/quickstart/connector/dto/KafkaRequestMessageDTO.java.
//Example for incoming DTO Format
package ai.flowx.quickstart.connector.dto;

import lombok.Getter;
import lombok.Setter;
import lombok.ToString;

@Getter
@Setter
@ToString
public class KafkaRequestMessageDTO { // TODO 5. Define incoming DTO format.
    private String Id;
}
- Define Outgoing Data Format (DTO): Specify the structure for outgoing data at the following path →
quickstart-connector/src/main/java/ai/flowx/quickstart/connector/dto/KafkaResponseMessageDTO.java.
// Example for Outgoing DTO Format
package ai.flowx.quickstart.connector.dto;

import lombok.Builder;
import lombok.Getter;
import lombok.Setter;
import lombok.ToString;

@Getter
@Setter
@ToString
@Builder
public class KafkaResponseMessageDTO implements BaseApiResponseDTO { // TODO 6. Define outgoing DTO format.
    private String name;
    private String errorMessage;
}
- Implement Business Logic: Develop logic for handling messages from the Engine and generating replies. Ensure to include the process instance UUID as a Kafka message key.
Optional Configuration Steps:
- Jaeger Tracing: Decide on Jaeger tracing use and configure a prefix name in the settings.
application:
  jaeger: # TODO optional: Decide whether you want to use jaeger tracing in your setup and choose a prefix name.
    enabled: false
    prefix: connector
- Health Checks: Enable health checks for all utilized services in your setup.
management: # TODO optional: enable health check for all the services you use in case you add any
  health:
    kafka.enabled: false
Upon completion, your configuration files (application.yaml and application-kafka.yaml) should resemble the provided samples, adjusting settings according to your requirements:
logging:
  level:
    ROOT: INFO
    ai.flowx.quickstart.connector: INFO
    io.netty: INFO
    reactor.netty: INFO
    jdk.event.security: INFO
server:
  port: 8080
spring:
  application:
    name: easy-connector-name
  jackson:
    serialization:
      write_dates_as_timestamps: false
      fail-on-empty-beans: false
application:
  jaeger:
    enabled: false
    prefix: connector
management:
  health:
    kafka.enabled: false
spring.config.import: application-kafka.yml
logging.level.ROOT: DEBUG
logging.level.ai.flowx.quickstart.connector: DEBUG
And your Kafka configuration file (application-kafka.yaml) should look like this:
spring:
  kafka:
    bootstrap-servers: localhost:9092
    security.protocol: "PLAINTEXT"
    producer:
      key-serializer: org.apache.kafka.common.serialization.StringSerializer
      value-serializer: org.springframework.kafka.support.serializer.JsonSerializer
      properties:
        interceptor:
          classes: io.opentracing.contrib.kafka.TracingProducerInterceptor
        message:
          max:
            bytes: ${KAFKA_MESSAGE_MAX_BYTES:52428800} #50MB
        max:
          request:
            size: ${KAFKA_MESSAGE_MAX_BYTES:52428800} #50MB
    consumer:
      group-id: kafka-connector-group
      key-deserializer: org.apache.kafka.common.serialization.StringDeserializer
      value-deserializer: org.apache.kafka.common.serialization.StringDeserializer
      properties:
        interceptor:
          classes: io.opentracing.contrib.kafka.TracingConsumerInterceptor

kafka:
  consumer.threads: 3
  auth-exception-retry-interval: 10
  topic:
    in: ai.flowx.easy-connector.in
    out: ai.flowx.easy-connector.out
spring:
  kafka:
    security.protocol: "SASL_PLAINTEXT"
    properties:
      sasl:
        mechanism: "OAUTHBEARER"
        jaas.config: "org.apache.kafka.common.security.oauthbearer.OAuthBearerLoginModule required oauth.client.id=\"${KAFKA_OAUTH_CLIENT_ID:kafka}\" oauth.client.secret=\"${KAFKA_OAUTH_CLIENT_SECRET:kafka-secret}\"  oauth.token.endpoint.uri=\"${KAFKA_OAUTH_TOKEN_ENDPOINT_URI:kafka.auth.localhost}\" ;"
        login.callback.handler.class: io.strimzi.kafka.oauth.client.JaasClientOauthLoginCallbackHandler
Setting Up the Connector Locally
For detailed setup instructions, refer to the Setting Up FLOWX.AI Quickstart Connector Readme:
»Readme filePrerequisites:
- a terminal to clone the GitHub repository
- a code editor and IDE
- JDK version 17
- the Docker Desktop app
- an internet browser
Integrating a Connector in FLOWX.AI Designer
To integrate and utilize the connector within FLOWX.AI Designer, follow these steps:
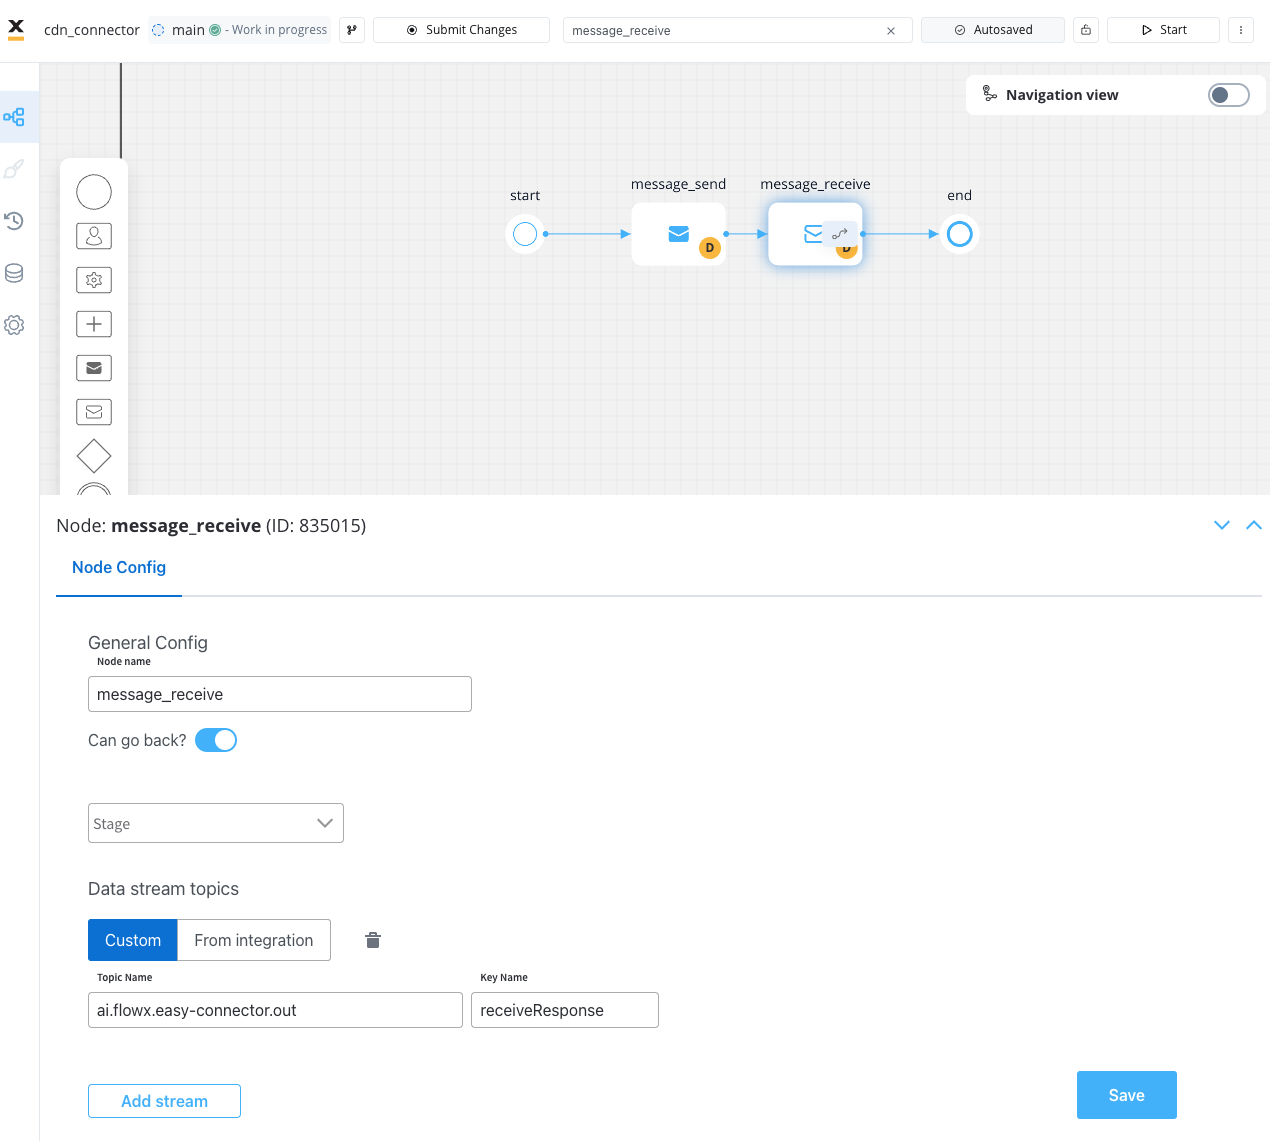
- Process Designer Configuration: Utilize the designated communication nodes within the Process Designer:
- Message Kafka Send Node: Transmit a message to a topic monitored by the connector. Make sure you choose Kafka Send Action type.
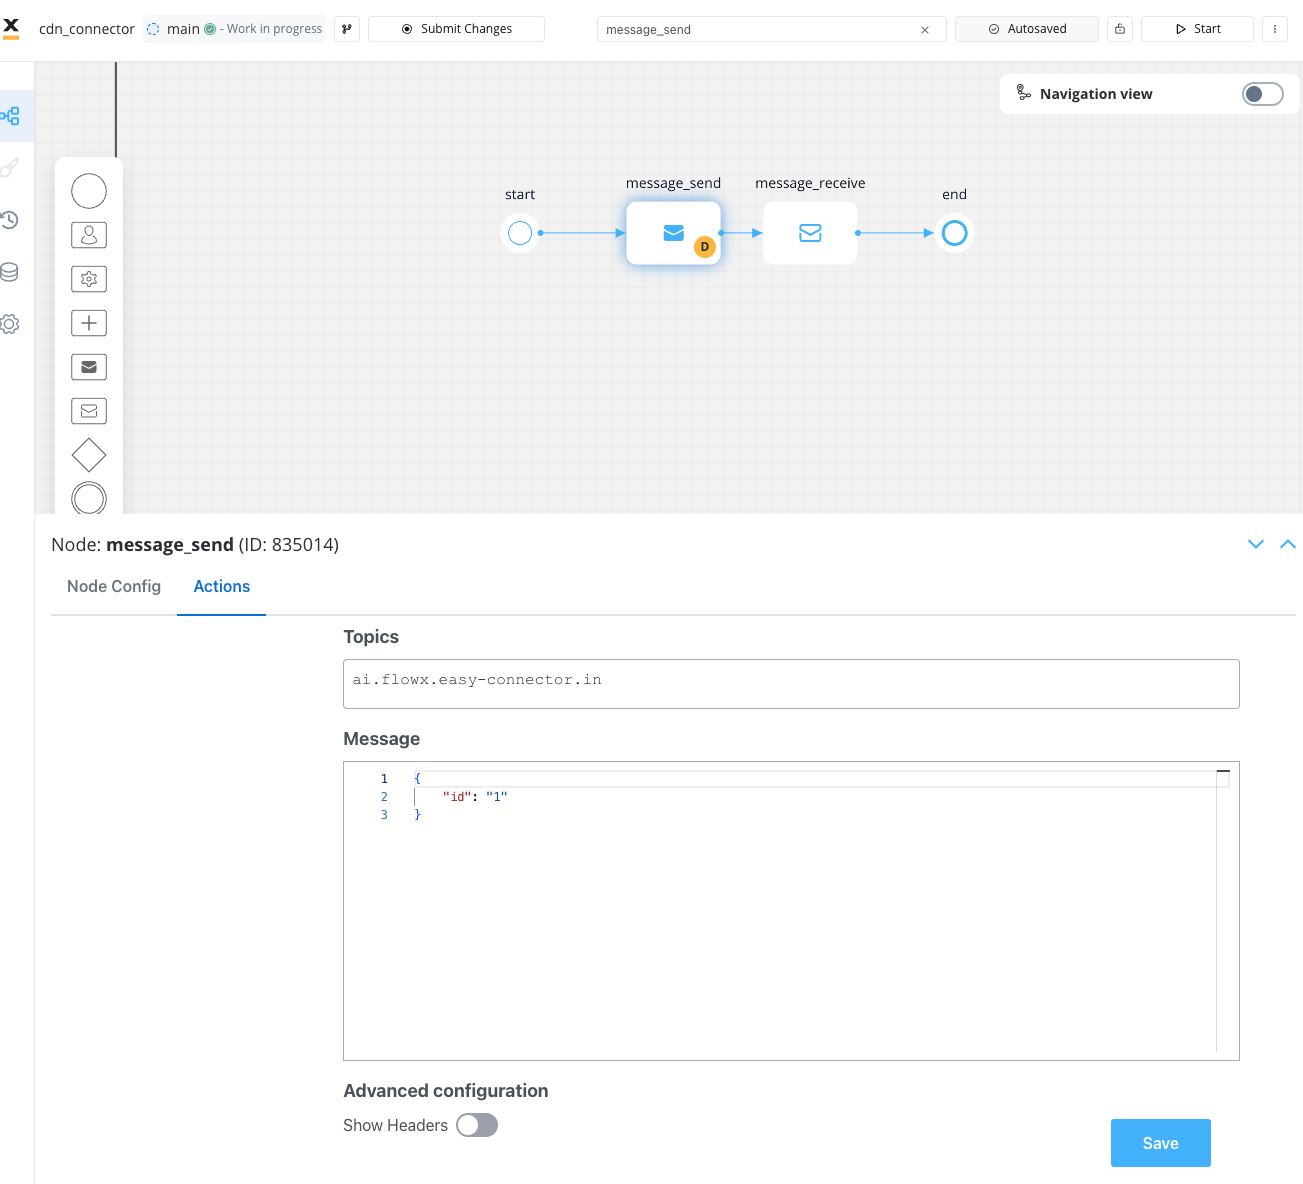
- Message Kafka Receive Node: Await a message from the connector on a topic monitored by the engine.
- Connector Operations: The connector identifies and processes the incoming message.
- Handling Response: Upon receiving a response, the connector serializes and deposits the message onto the specified OUT topic.
- Engine Processing: The engine detects the new message, captures the entire content, and stores it within its variables based on the configured variable settings.
You can check another example of a more complex connector by checking the following repository:
»Currency Exchange Example Connector